Interior Design Students: Turn a Measured Room into a Plan You Can Explain

A room project becomes easier to explain when every drawing answers a question about how someone will use the space. A mood board can establish a direction, but a measured plan, a section and a selection schedule show whether that direction can become a workable proposal. Build those pieces together from the beginning.
Begin with a measurement record
Sketch the existing room and choose a fixed reference corner. Record wall lengths, ceiling height, openings, door swings, columns and visible service points. Cross-check dimensions that should agree, such as the overall length and its component segments. Mark any inaccessible or uncertain measurement. Do not silently turn an estimate into a precise dimension in the final drawing.
Separate the existing room from your proposed additions. Keep photographs linked to numbered views on the sketch, so you can return to the correct wall later. If this is an academic exercise rather than a real surveyed room, label the brief's dimensions as supplied information.
Translate the brief into activities
Write down the people, activities and belongings the room must support. For an illustrative study-bedroom exercise, the brief might include sleeping, studying, storing books and clothes, and joining a video tutorial. Ask which activities can share a space and which interfere with each other. Storage should respond to actual items rather than to an attractive cabinet image.
CIDQ describes interior practice as including space planning, materials and furniture selection, lighting, documentation and coordination. That breadth is a useful reminder to review the room as a whole. This article's exercise is our suggested study workflow, not a professional certification checklist.
CIDQ: the scope of interior design
Draw two layouts before choosing finishes
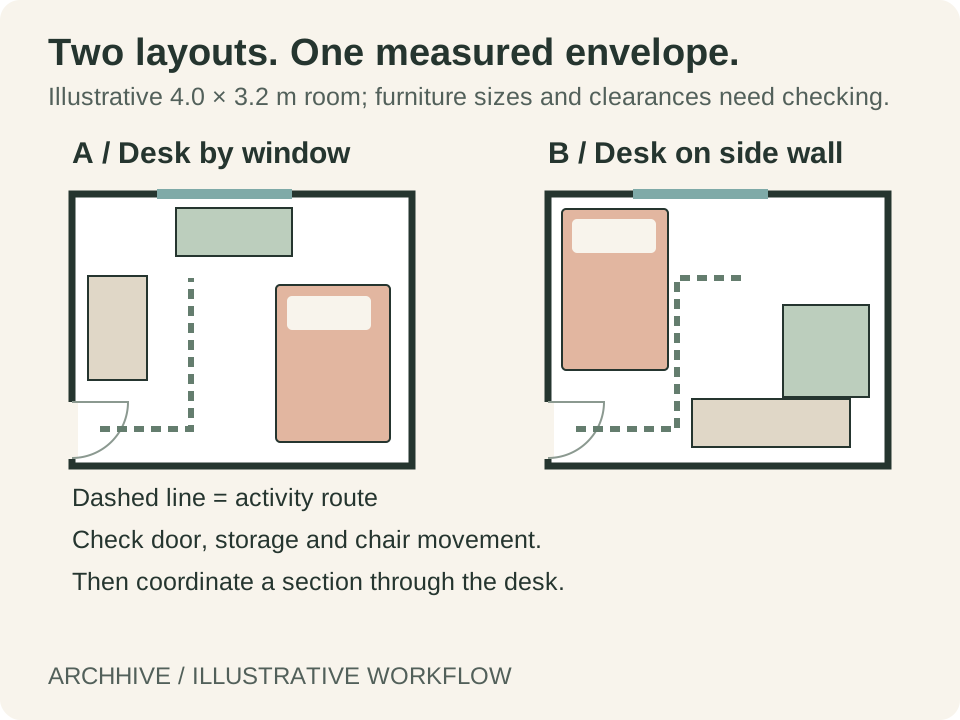
Use the same brief and measured envelope for both options. One layout might place the study position beside the window; another might give that edge to shared seating. Draw furniture at its actual proposed dimensions and show the space needed to use it, including doors, drawers and a pulled-out chair.
Compare the options against the activities rather than against a favourite aesthetic. Where a required clearance or safety provision affects the decision, use the applicable project requirements and the relevant local guidance. A furniture symbol or a convincing render does not confirm compliance.
- Does the route between the entrance and the main activities remain clear?
- Can storage open while someone uses the adjacent furniture?
- What will a seated person see, and what will the camera show during a call?
- Which dimensions and service positions still need confirmation?
Coordinate the plan with a section
Cut a section through the most important relationship: desk and window, storage and ceiling, or seating and lighting. Show the relevant heights, not just a decorative outline. Check that shelves, curtains and fittings fit the same geometry shown in the plan. This often exposes problems that remain invisible in an overhead layout.
ArchHive's Site Study is currently for site context, massing and conceptual exterior shadows. It does not provide an interior room planner, section editor or interior daylight calculation. Prepare this room exercise in a drawing or modelling tool suited to the task, and use a supported model handoff when you need to discuss its larger site context.
Prepare one review pack
Bring a measured base plan, the two options, a selected plan and section, and a short furniture and finish schedule to the review. Use a consistent item identifier across drawings and schedule entries. Include unresolved questions alongside your chosen option. A useful critique can then address a specific relationship or missing measurement rather than only commenting on the atmosphere of the image.
Get Interior Design Students: Turn a Measured Room into a Plan You Can Explain Resources on ArchHive
Browse professional materials, templates, and expert guidance related to this topic.
Explore ResourcesFound this useful? Share it
About the Author
Original workflow guides from ArchHive Editorial. Examples are illustrative; source links distinguish professional context from our suggested exercises.